You often see these at weddings and parties hanging from the trees... now here you can make your own origami birdies. They are the most impressive when made in "bulk" the more the prettier.
You need to start off with a square piece of paper. I'll explain in a step by step fashion so that it is easy to follow!
Step 1: Fold the square in half corner to corner to form a triangle.
Step 2: Fold the triangle in half, corner to corner, to form a smaller triangle.
Step 3: With the triangle lying in front of you with the point away from you and the flat side towards you, open up the top part of the triangle, and fold the inside of the right corner to the inside of the left corner.
Step 4: You should have a shape that looks like a square with a triangle to it.
Step 5: Turn over with the long flat side towards you, and the triangle point to your left. Repeat step 3.
When folding it over bring the left inside over to the right bottom inside.
Step 6: You end with a square. Place the square in front of you with the "open side" towards you.
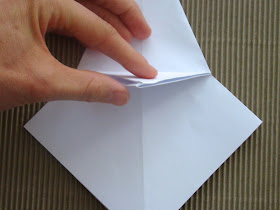
Step 7: {Step 7 and 8 are just to give you lines to fold it on in step 9, but you need those lines to fold it} Fold the left and right corners towards each other as in picture below.

Step 8: Fold the top corner down as in picture below
{Then open the folding of steps 7 and 8}
Step 9: Open the bottom top piece only and fold the paper on the creases you have made with the previous 2 steps. You with end with a kite like shape on the top.
Step 10: Turn the paper around and repeat steps 7 to 9
{Ending with a kite shape}
Step 11: With the kite shape lying in front of you with the sharp corners to the sides. Fold the top part of the end that points towards you, and fold it open away from you. You will see now the end pointing away from you has 3 layers and the end towards you only one.
Step 12: Turn it over with the 3 layers pointing towards you. Then again fold the top one up, away from you. You will see that the right side will show two points as in picture below.
Step 13: Fold in half folding the left sharp point over to the right, where the two split points are.
Step 14: Turn over and repeat.
{To end with a triangle}
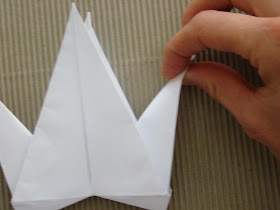
Step 15: Open up the two outside layers and pull the two split points out, till were you feel is enough {see picture below} and crease the paper so that they will stay there.
Step 16: Divide the point on the one side and inside fold it to form the head.
Step 17: Hold at the front of the bird {you need to hold the bottom of the wing} and put the wing down until it stays there to make a rounding the wing.
And there you have your basic bird... if you want to play with it you can pull on the tail and the wings should go up and down :-) but to hang it...
Step 18: Thread some embroidery cotton from the bottom through the top angle of the bird {make a knot in the thread to keep the bird there, and cut just under the knot} you can put a lot of them on one thread and just make a knot to secure them at the different levels.
Hang in a tree and enjoy!


No comments:
Post a Comment